Using .NET Core previews with Docker and Fedora
Few days ago, Microsoft announced the Preview 7 of the upcoming .NET Core Version 3.0 Runtime. You can download the preview bits under this link and install the Preview SDK for your envrionment.
But installing a beta version of .NET Core with possible breaking changes on your developer machine is probably not what you want. Microsoft also warns against using preview versions for productive systems:
Preview releases provide early access to features that are currently under development. These releases are generally not supported for production use.
Of course, you could configure your probjects with global.json to define which .NET Core SDK version is used when you run .NET Core CLI commands. But there’s a better solution by using a Docker container. Fortunately, Microsoft also publishes Docker Images with the latest Preview Versions of .NET Core.
In this post I’m describing how to use .NET Core Preview with Docker and VS Code Remote Development running under Fedora 30. Let’s start installing docker for Fedora
$ sudo dnf config-manager --add-repo https://download.docker.com/linux/fedora/docker-ce.repo
$ sudo dnf install docker-ce --releasever=29
Note: There is still no docker-ce repo for Fedora 30. So you must install the docker-ce package with the –releasever=29 argument. See this Github Issue for more details. Dnf automatically upgrades the fedora 29 version in favor of Fedora 30 stable as soon the release of docker drops for Fedora 30
Now, be sure the docker daemon starts automatically when your computer has started
$ sudo systemctl enable docker.service
$ sudo systemctl start docker.service
Ensure your user belongs to the docker group, otherwise the Visual Studio Code Remote - Containers extension won’t work.
$ sudo usermod -aG docker $USER
Sign out and back in again so your changes take effect. Check your docker installation by running the docker run hello-world command
$ docker run hello-world

Unable to find image 'hello-world:latest' locally
latest: Pulling from library/hello-world
1b930d010525: Pull complete
Digest: sha256:6540fc08ee6e6b7b63468dc3317e3303aae178cb8a45ed3123180328bcc1d20f
Status: Downloaded newer image for hello-world:latest

Hello from Docker!
This message shows that your installation appears to be working correctly.
Setting up Visual Studio Code for Linux is also an easy task. Simply follow this guide to install Visual Studio Code for Fedora Workstation. Then you can checkout my sample application from my GitHub account by cloning the repository using Git and start Visual Studio Code.
$ git clone https://github.com/gest01/dotnet-preview-docker-vscode-remote.git
$ cd dotnet-preview-docker-vscode-remote
$ code .
When Visual Studio Code is up and running, use the built-in extension manager to install the VS Code Remote Development Extension.
Visual Studio Code Remote Development allows you to use a container, remote machine, or the Windows Subsystem for Linux (WSL) as a full-featured development environment
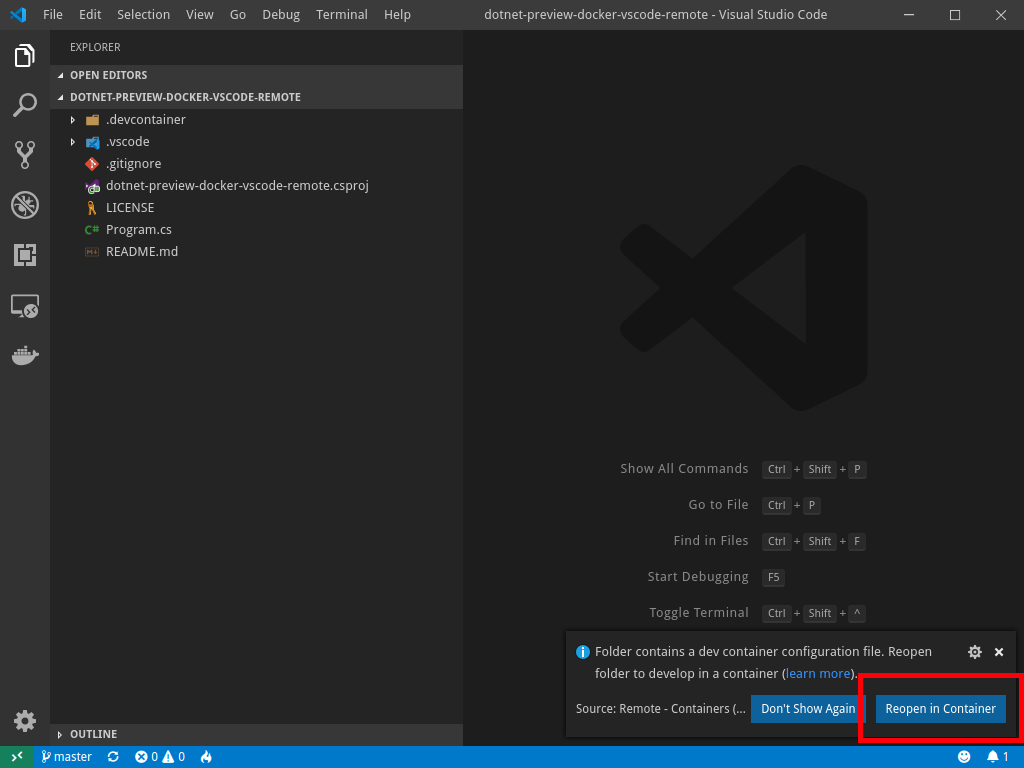
Restart Visual Studio Code and open up the folder again. In the lower right corner a notification pops up, due the project contains a dev container configuration file. Click “Reopen in Container” to reopen the project in a container.

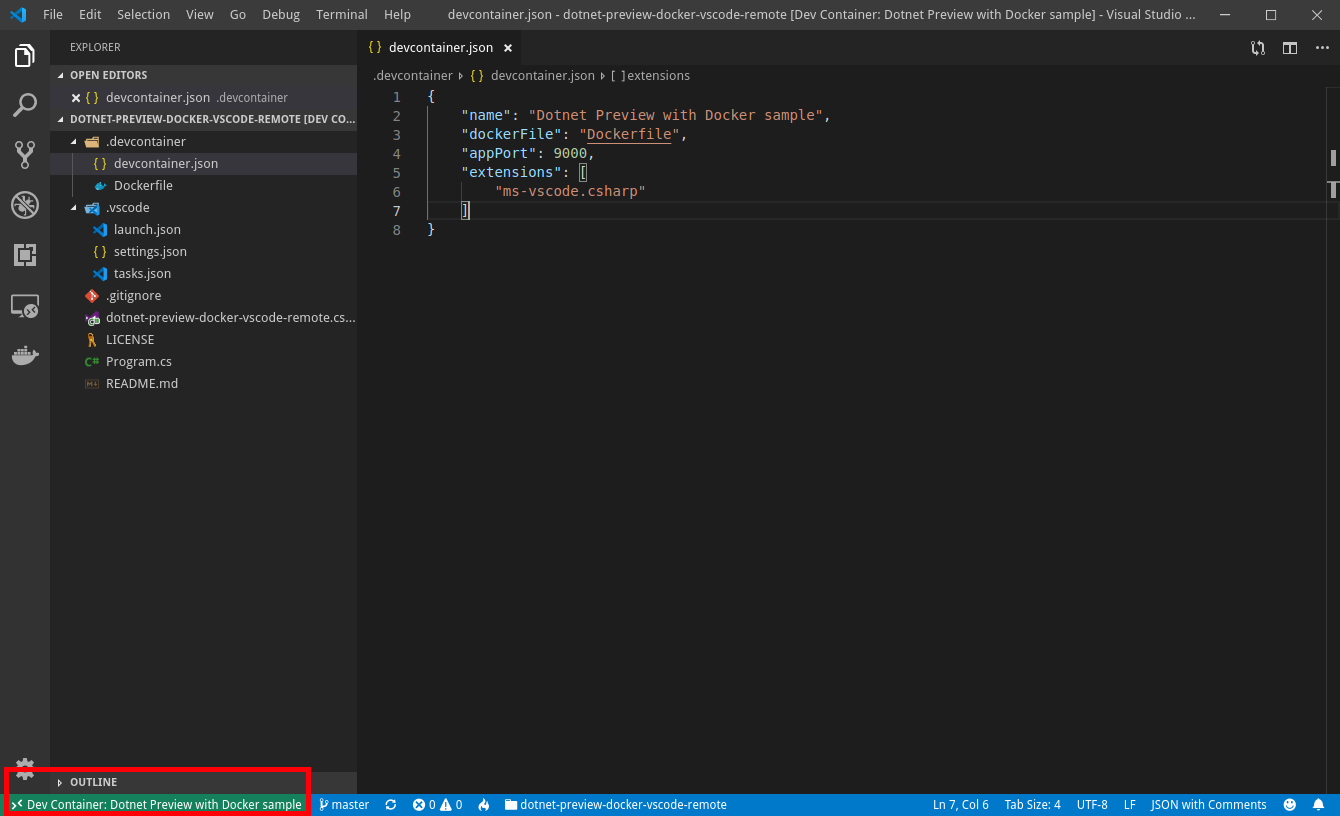
In the lower left corner the green status bar indicates whether the project is opened inside a container.

VS Code automatically connects to it and maps the project folder from your local file system into the container. The Remote Development Extension automatically detects the dev container configuration file (devcontainer.json).
This file is similar to the launch.json file for debugging configurations, but is used for launching (or attaching to) your development container instead. You can also specify any extensions to install once the container is running or post-create commands to prepare the environment. The dev container configuration is either located under .devcontainer/devcontainer.json or stored as a .devcontainer.json file (note the dot-prefix) in the root of your project (documentation).
{
  "name": "Dotnet Preview with Docker sample",
  "dockerFile": "Dockerfile",
  "appPort": 9000,
  "extensions": ["ms-vscode.csharp"]
}
The port 9000 is forwarded using the appPort property which makes it very easy to call your application from the host. The devcontainer.json also references a Dockerfile wich is used to build the container. The sample application uses the core-nightly/sdk:3.0 image
FROM mcr.microsoft.com/dotnet/core-nightly/sdk:3.0

# Configure apt
ENV DEBIAN_FRONTEND=noninteractive
RUN apt-get update \
    && apt-get -y install --no-install-recommends apt-utils 2>&1

# Install git, process tools, lsb-release (common in install instructions for CLIs)
RUN apt-get -y install git procps lsb-release

# Clean up
RUN apt-get autoremove -y \
    && apt-get clean -y \
    && rm -rf /var/lib/apt/lists/*
ENV DEBIAN_FRONTEND=dialog

# Set the default shell to bash rather than sh
ENV SHELL /bin/bash
The application sets the Target Framework Moniker (TFM) to netcoreapp3.0 in order to use .NET Core 3.0. Btw, a reference to the metapackages Microsoft.AspNetCore.All or Microsoft.AspNetCore.App is no longer necessary.
<Project Sdk="Microsoft.NET.Sdk.Web">
  <PropertyGroup>
    <TargetFramework>netcoreapp3.0</TargetFramework>
  </PropertyGroup>
</Project>
See the official migration guide from ASP.NET Core 2.2 to 3.0 for more information.
The sample uses a bunch of new API’s like GC.GetGCMemoryInfo or GC.GetTotalAllocatedBytes which are available in .NET Core 3.0 only. Now simply start a debugging session by pressing F5 and browse to http://localhost:9000/. You should see an output similar like this
Hello docker remote from ASP.NET Core!
Environment.Version=3.0.0
RuntimeInformation.FrameworkDescription=.NET Core 3.0.0-preview7-27912-14
RuntimeInformation.OSDescription=Linux 5.1.19-300.fc30.x86_64 #1 SMP Mon Jul 22 16:32:45 UTC 2019
RuntimeInformation.OSArchitecture=X64
RuntimeInformation.ProcessArchitecture=X64
GC.GetGCMemoryInfo.HeapSizeBytes=0
GC.GetGCMemoryInfo.MemoryLoadBytes=0
GC.GetGCMemoryInfo.TotalAvailableMemoryBytes=16674553856
GC.GetTotalAllocatedBytes=561224
